Compression is one of the most important skills to master in music production but is usually seen as a dark art by those who haven’t quite grasped it.
In this blog post we’re going to walk through the best way to set up a compressor so you can really hear how it’s changing your sound in order for you to make proper judgement. We’re using Ableton’s compressor in this example but the following technique can be applied to any compressor.
Why use compression?
There are many uses for a compressor – from smashing transients on a snare, to smoothing out vocals. Your final settings will depend on what you’re trying to achieve. In this example we’ll be compressing a drum loop. The aim will be to keep the punch on the drums by allowing some transients through, but controlling the overall level in order to thicken up the sound.
Basic controls
Ableton’s info view does a decent job of explaining the controls on the compressor while hovering your mouse over them. Here’s a brief (and not so technical) overview of the important parameters we’ll be using in this tutorial:
Makeup
Makeup is an automatic gain control which increases the output volume as you compress. I mention this only because we will be turning this function off.
Threshold
Threshold is the level at which compression takes place on our incoming signal. This can be loosely thought of as the amount of compression.
Ratio
This can be loosely thought of as the strength of compression. Higher ratios will result in stronger compression.
Attack
The attack controls how fast the compression kicks in after the signal breaches the threshold. Raising this parameter has the effect of increasing transient detail by allowing the first few milliseconds of the signal to pass through uncompressed.
Release
The release controls how long it takes for compression to stop after the signal falls back below the threshold.
Gain Reduction Meter (GR)
The gain reduction meter shows how much the compressor is squashing (reducing gain on) the signal.
The trick is to overdo it…
In order for us to effectively set our attack and release controls we need to really hear what’s happening. Overdo the amount of processing, make the ideal settings then dial back the amount.
Let’s Compress…
Select a drum loop for this tutorial. Open up Ableton’s compressor, then work your way through these steps:
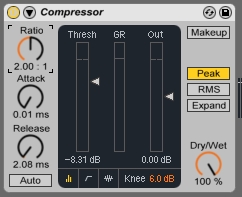
1. Start with the makeup switch off. The attack at 0.01ms and the release at around 2ms. Having the release at 0ms would probably create distortion which we want to avoid in this example.
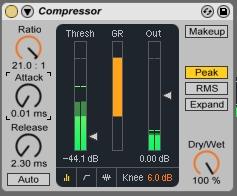
2. Crank up the ratio to around 20:1 so we get very strong compression and with the loop playing, pull down the threshold until there is a large amount of gain reduction happening in the GR meter.
Now we are over compressing the signal, let’s move on to the attack.
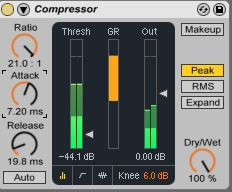
3. Slowly increase the attack and listen to the signal as you do it. As the attack reaches around 6.0 or 7.0ms you should hear the transients appear, bringing the snap and punch back in to the loop. You can now set the attack according to how much of this punch you want in the end result.
4. Watch the GR or gain reduction meter whilst setting the release. In this example we want the compressor to reset after each drum hit in the loop. So the release should be quite fast, the GR meter should be returning to or almost to zero between drum hits.
The best release setting is dependent on the tempo of the loop. Faster tempos will lead to less time between hits and therefore a faster release setting.
You should hear the compressor creating a sucking effect as it releases in between hits. Use your ear to ultimately decide on the correct timing and groove the release creates.
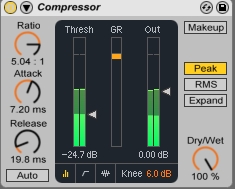
5. The attack and release is dialed in, now we can pull back the threshold so it’s effecting only the peaks of the input signal.
6. The ratio can also return to reasonable setting. Around 5.0:1 sounds fine in this example, this ratio is strong enough to control the high peaks but remains quite transparent.
Again, your ears should be the ultimate decider on these two settings. You can experiment with ratio and threshold with confidence knowing the attack and release is set.
7. Whilst bypassing the compressor on and off you can use the output control (Out) to the right of the GR meter to make sure the compressed signal is of equal volume to the uncompressed/bypassed signal. This way you can make proper judgement on exactly what effect your compressor is having.
For more information on the many different ways to use compression and when you should do it, book a masterclass at Idealnoise.